I like having lots of different projects going on at once. And while yes, this does tend to lead towards having quite a few UFOs, it also means that I always have a project that matches my time, mood and energy.
I’ll try to keep at least one project for each different type of sewing that I do at the work-in-progress stage. At any one time I’ll try to have have active projects that are: English paper-pieced 3-D container, machine piecing, machine quilting on my Bernina Q20, English paper-piecing. I might also have projects that are at different stages in the quilting process: designing, pulling fabric, cutting fabric, preparing binding, etc. Sometimes projects get stacked up at different stages, too, but using a tracker helps me see that at a glance.
This method gives me lots of variety and choices, but it also makes it hard to remember what stage each project is at. To keep track of my projects (both active work-in-progress and paused UFOs), I use a physical project tracker. I’ve tried using digital trackers and lists before, but I’m really a paper planner kind of girl!
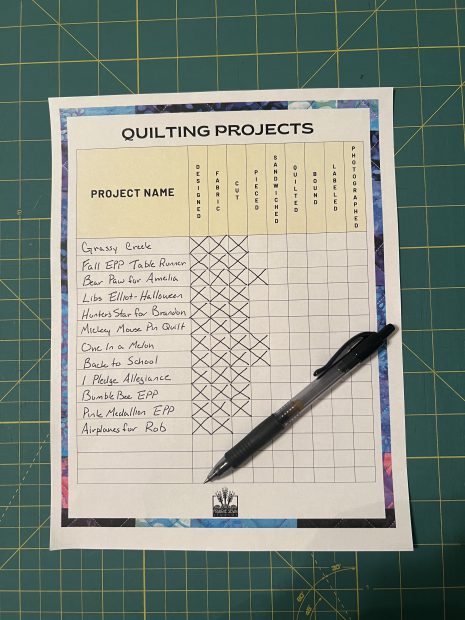
Quilting Project Tracker Worksheet

My project tracker is just an 8”x11” chart that I printed out on my home printer. It has space to list each of my ongoing projects, plus columns of check-boxes where I mark off any stage that’s been completed. The columns are more or less in the common order that I work on my projects. As I complete each step as I’ve mentally defined it (in italics below), I mark it off. If I complete steps “out of order,” such as choosing fabric first and then designing a quilt, I still just mark off the boxes as I complete them.
- Designed – quilt top designed
- Fabric – fabric acquired, either from the stash or from my local quilt store
- Cut – cut out all the pieces for the quilt top
- Pieced – quilt top pieced, including borders
- Sandwiched – quilt top is sandwiched, basted, and ready for quilting
- Quilted – quilting is complete
- Bound – binding is attached
- Labeled – label is attached
- Photograph – quilt has been photographed: front, back, label, closeups
It’s pretty straightforward to keep the chart up-to-date, as it’s just checking a box when a step has been completed. I can see at a glance where each project is, and that can help me choose what project I’m working on if I only have limited time to sew. If I run out of room, I just print another page and make a new list. I keep my listed taped up in my sewing studio to make sure it doesn’t get lost under a pile of fabric!
Give It a Try!
Using a project tracker helps keep me from losing track of my quilting projects, and I want to help you do the same! My project tracker page is available as a free downloadable PDF file! Follow the instructions at this link, and don’t forget to check your email to confirm and access the PDF Project Tracking page!
I’d love to see your filled out tracker pages! Post a picture of your quilt project tracker page and tag Prairie Sewn Studios on social media (@prairiesewn).
Disclosure: Some of the links above are affiliate links. This means that, at zero cost to you, I will earn an affiliate commission if you click through the link and finalize a purchase.


Leave a Reply